Proposal Checklists
The Proposal Checklist is a guided compliance tool within VisiumKMS that ensures all required tasks, reviews, and workflow actions are triggered before a MOC workflow process begins. By answering a structured series of questions, the system can automatically:
- Default the necessary Category.
- Trigger required Action tasks and assigns them to the appropriate Action step.
- Apply workflow and location specific compliance rules.
- Reduce manual effort and human error when setting up records.
- Create an auditable and consistent process for all initiated records. This feature supports users by providing a simple interface while also allowing for administrative guidance during the initiation of records.
Administration of Proposal checklists
Turn on Proposal Checklist and Action Tabs
- Navigate to the Administration tab and select Workflows from the drop-down.
- Select the details button for the workflow you want to turn on the Proposal Checklist.
- Check the box on Proposal questionnaire required for Proposal Completion.
- Once the feature is turned on, the checklist and action tabs will populate on each record created with this MOC type. NOTE: For this feature to be available, contact VisiumKMS support to turn it on.
Configuring Proposal Checklists
- Navigate to Administration tab and hover over the Checklist option.
- Select Questionnaire from the secondary drop-down list.
- This will open the Proposal Checklist Administration page and allow for new checklist to be created or existing checklist to be edited.
Create a New Checklist
- Enter a checklist name. NOTE: If there is checklist information already displayed, reload the page. This will clear out any previously selected checklist data and allow for new checklist information to be entered.
- Select which locations this checklist will be active.
- Once all required information has been entered, select the Add button at the bottom of the page. This will officially create the new checklist and allow for questions, response and actions to be created.
- Add questions. NOTE: Each new checklist pre-loads 1 new question automatically when created. You can begin by selecting the “New Question” and defining the question text. When a question is selected, the question will expand and allow for you to view and edit, as seen below. For each edit made to a question or response, click the Save button
- For each additional question, select the Add Question button at the bottom of the page, this will generate a new question.
- Create responses as needed for each question. In the edit screen, select Add Response. This will create a response to the question that you must define.
- For child questions, select the response that should trigger the child question, and from the edit screen, select Add Question.
Edit a Checklist
- Find a checklist from the available Active checklists and click the Select button.
- This will open the checklist with all its data. This is view only, to edit the checklist you must click the Create New Draft button.
- This will open the checklist in Draft mode and allow for edits.
Assign Response Categories
- Categories are assigned to individual responses, not the checklist itself. This means, for every response selected when filling out the Proposal Checklist, a new category will be added to the MOC.
- This allows for flexibility not only based on location but the checklist responses as well.
- This feature can also limit some of the guess work that users may have when selecting a category. Based on their responses to the Proposal Checklist the necessary categories are automatically added to the MOC and cannot be removed.
Create Default Action Items
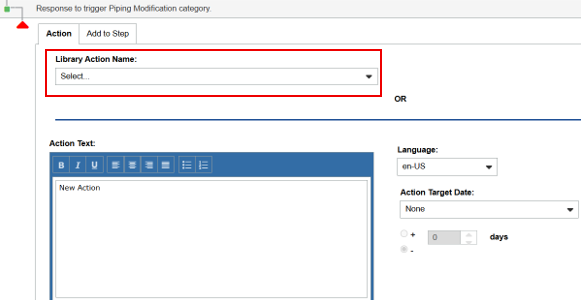
For each question and response created you can assign a default action to populate. When configuring actions, you now have two options, select from a library of commonly used actions or create them manually.
To create actions manually:
- Select the question or response you want to trigger the new action to populate.
- From this expanded view, select the Add Action button.
- Once an action is created the action information can be filled out.
- For an action to be configured, the Action Text must be added.
- Other options for defaulted information are: A. Action step assignment B. Action Target Date C. Action Assignments
To select an action from the library:
- Ensure the action is created in the library.
- Select the window in the Library Action Name drop-down and select from the available actions.